Friday, July 23, 2010

A couple of "out there" looks that may inspire you....or not! lol

Make-up is suposed to be fun...here are two pics of me having a play around. Excuse the horrible stray eyebrow hairs in the first photo, I was being quite lazy.....euwwww!! lol I also remember taking this pic in macro and I think the lighting just zoomed in on them.

This pic below is just a riot of colours with a double winged eyeliner...makes it look like a
egyptian on LSD!! lol

The rhinestones on my false eyelashes caught the light just beautifully in this pic....

A blue eyeshadow has just been packed on over a cut bit of an old fishnet stocking to get that effect.Simple huh!!??

A wearable "gold and brown" look...

As I have blue eyes... I love my golds and coppers, those colours really highlight my eye colour, so I've done a wearable gold look which is quite tame (in my eyes!!lol) I keep thinking I may have to break out and do some more bold colours and just have some REAL fun mucking about. (I'll show you a couple that I've done recently, just playing with make-up)

Leave your foundation till last (it's sometimes easier to clean up "fall out" of eyeshadow powder which can easily be swept away before you apply your foundation. Prep your face (cleanse, moisturise).

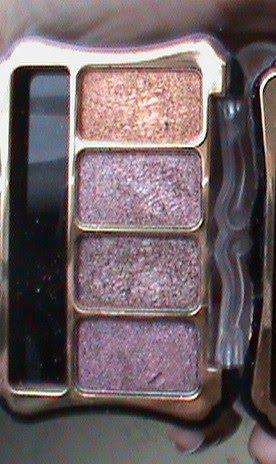
Apply a small amount of concealer as a base or an eye primer and then using a small flat shader brush apply a soft gold to the inner corner of your lid to the middle, bringing it up to the crease. I used Loreal "Made for me naturals Dark Brunettes"... the number 1 colour you see in the pic.


Next pack on (like patting the eyeshadow on instead of sweeping it) a metallic gold to the rest of your lid to the outer corner and bring in to meet the soft gold and again also up to your crease. Blend these two together in the middle so there are no harsh lines, pushing the metallic gold over the inner corner way. I also put abit of the metallic gold a third way from the outer corner, under the lower eyelash line. I used a cheap asian shop eyeshadow (Baolishi number 2 palette), its the top colour of the palette, cost me a rediculous $5 but I love it!!lol

Right, next I got a metallic brown colour, the colour on the bottom on this cheap palette and with a blending brush swept it through the crease of my eye, bring it up over the crease just a little. Just go 3/4 of the way across your crease. Keep the inner corner highlighted with the soft gold. I then gave my crease abit more depth with the very dark brown the number 2 eyeshadow from loreal palette that you would've seen in the photo above.

I'm sorry, I forgot to take pictures of the next steps but they're standard things to do to finish your eye off. I applied a small winged eyeliner with liquid eyeliner. I then applied a black kohl pencil to my waterline and a couple of coats of mascara. I filled in my eyebrows, swept away any fall out and then applied my concealer and foundation. I added some bronzer all over my face but mainly concentrating on my cheeks, bridge of the nose, temples and middle of my forehead.

Next I used a lipliner in a brown/orange shade (BYS in number 4 Cafe Latte, you can buy the BYS brand from Glassons I think). Line you lips with the pencil and then fill them right in. I then applied a clear lipgloss over the top.

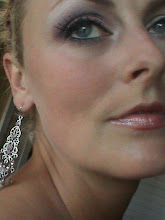
This is the finished look.....


To be honest, these pics don't really do the colour justice. My camera crapped out so I have been using a camcoder to take these pics and they just don't seem to pick up colour very well...they looked washed out really:( Sorry guys....I just can't afford a new proper camera right now....plus perhaps I need to step away from the window a few paces, too much light!!...hehe


QUICK SIMPLE EYESHADOW TIP....


This is just a quick tip on giving your eyeshadow colours more depth or more pop!


As you will see from the pic above, I have a swatch of a creamy soft black eye pencil with a swatch of a blue eyeshadow next to it (MAC Freshwater). Beneath those two is what the blue eyeshadow looks like under a black base..gorgeous deep midnight type of blue! Apply the black to your lid and then blend in the colour you choose. You could play around and do a whole heap of swatches with your eyeshadows and come out with an awesome more deeper colour. To give eyeshadow more "pop".. you would use a matte white eye pencil as a base... this will make the eyeshadow really stand out. So you kinda get 3 colours out of the one eyeshadow pretty cool eh??!!


One other thing to remember with colour on the face is that dark colours bring your features in and in some cases like with contouring make features appear thinner,while light colours highlight and make your features stand out.


Wednesday, June 23, 2010

40's MAKE-UP/PIN-UP LOOK

Hi guys as promised, my version of 40's/ pin-up make-up.

First prepare your face (concealer, foundation, powder to set). The prime your eye (I just use a tiny bit of concealer). Use a creamy eyeshadow pencil as a base for your eyeshadow powder. The reason for this is it helps to bring the eyeshadow colour out and make it stay on longer. I also fillin my brows at this point as it helps to give me a frame to work with when applying the eyeshadow.
Select a nude/cream/beige colour eyeshadow and apply this from lid to brow. It can be shimmer or matte..your choice.


Next get your blending brush and apply a medium brown to the crease of your eye. This just gives your eye abit of contour and depth. Otherwise applying a light shade over your lid and that is all would look abit weird! lol


Use a liquid eyeliner to give the famous pin-up cat's eye. Now this is where it can get tricky, but with some practice it starts to become very easy. What I do to help me is draw a small line on an angle from the corner of my outer eye toward the end of my brow. Then I take the liner across my lashes and connect it to the line I made previously. You can also do a "connect the dots" along your lash line too! I find using a liquid liner shaped like a felt-tip pen makes it so much easier and more precise when you are learning. I've used Maybelline define-a-line liquid liner pen. If you want to, you can add some false eyelashes to complete the look. That's the eye's done! Very simple! *EDIT* I forgot to take a pic of doing the eyeliner sorry.. but you can see in the finished look. I might do a quick tutorial on how to do the cats eye with liquid eyeliner later on!!


The red lips (my favorite part!! lol) Use a sharp pencil and start on the bottom lip. Kind of stretch your lip out and instead of using the point of the pencil, put it slightly on it's side and start lining your lips. Then line the cupids bow of your top lip. Do one side of the bow at a time and then start lining down the sides and connect to the corners of your lips. Fill your lips in with the pencil to give your lipstick a base. Make sure you get into the corners with the liner because there is nothing worse than seeing a big gap with no colour when you talk or open your mouth.


Grabbing a lipliner brush (a must for precision) get some of your chosen lipstick and start to fill in your lips. Blot with tissue and then apply some more lipstick.

Next grab a small brush and add some concealer. Line the outside of your lips with this and then blend outward. Take your time with this as you do not want to smudge your lipstick! Putting concealer around you lips makes the lips stand out more and also tidies up the line giving your lips a clean sharp look. Including the liner, concealer also helps to stop the lipstick from feathering into the fine lines.


You can then apply alittle blusher to the apple of your cheeks if you like, but I personally just like adding a dusting of bronzer to give my face abit of colour, as red lipstick can make you look abit pale. I do concentrate on the cheeks, but also add alittle bit of bronzer to the temples, chin and middle of the forehead.


This is the finished look!! I had abit of fun with the 40's by wearing a bandana and a trilby hat!
I hope you like it and give it a go yourself! It is such a classic and elegant look and is lovely to wear for an evening out, or if you're like me...anytime of the day!!! lol


Wednesday, June 16, 2010

Hiya


Just a quick note to say that in the next few days I will be doing one of my favorite looks... the 40's/50's pin-up look. It's VERY simple and elegant looking, the only tricky part is the liquid eyeliner!! With abit of practice and some tricks you'll be able to do it too!!

I love a good red lipstick in winter but sometimes it's so hard to find a "vintage" red colour that I like. However, I went to a friends nutrimetics party last week and sampled one of their red lipsticks. The comments I got were, "that looks like the kind of red the women used to wear in the 40's or something". Well, that was it for me...I was SOLD!! lol Plus it is a blue toned red..perfect for my skin tone. The name of the lipstick colour is called Kimono. Stunning!

So anyway, as soon as I recieve it, I will do a pin-up tutorial!!

Watch this space!!xx

Friday, June 11, 2010

NIVEA NATURAL VOLUME LIPBALM


Hey Guys,


Was standing in the supermarket queue the other night and spotted this Lip Balm... lol I'm a shocker for impulse buys with those items by the checkout! Thought I would do a quick review on it, just in case you guys have the same "sucked-in" habit I do!! hehe

I have a thin top lip and anything that has "volume", "plump", "collegen enhancing" will get my attention!!

The Nivea Natural Volume Lip Balm claims that it helps naturally enhance you lips, with light reflecting pigments for a gorgeous shine.

My honest opinion?? I wouldn't say it volumises my lips, at first I thought there may have been a slight difference but I think that was more a placebo effect happenin' there!! lol

I have to say, it makes you lips feel nice, it isn't sticky or "gluey" feeling and there is a slight pretty fleck in it to catch the light. The great thing is that it has a SPF of 30.

Bottom line, this balm is nothing to write home about, it's same as any other light reflecting lip-balm. It will keep your lips moisturised and pretty during this cold winter season, and it's nice and compact in your pocket to take anywhere. Also, at $5.65 it's hardly going to be something you regret..everyone needs a lipbalm in winter!!!


Thursday, June 10, 2010

EASY DRAMATIC SMOKEY EYE....

I know when I first started out with make-up I used to see these awesome smokey eyes but could never do them properly.. they always ended a mess! But then I found eye pencils that made the job much easier... I'll show you how I did this smokey eye!

First, the tools you will need:

Maybelline Define-a-line pencil eyeliner (has a sponge on the other end...very handy)
Matte Black eyeshadow
Gun metal grey eyeshadow
a brow highligher of your choice.. I used a very light beige shimmer eyeshadow

For the lips: Body Shop Lip liner pencil in 10 Pinkbrown
a clear lip gloss.

A shader Brush
and I just would not be without my MAC 217 blending brush
Here we go....

After applying primer to your eye, apply the define a line eyeliner in a random mess along your lid!! lol Scary looking, I know!! Make sure that you apply the liner very close to your lash line also!


Then with the sponge tip we are going to blend it out so that it's all over the lid and even. At this point you can put a piece of sticky tape down from the corner of your eye on an angle to the end of your eyebrow and this will stop it from going every where and give you a nice straight line to work with.


Next take abit of the matte black eyeshadow with your shader brush and just "pack on" gently to the lid to set the kohl pencil and prevent it from travelling all over your eye! Then take your blending brush dip the end into the gun metal grey eyeshdow, tap off the excess and start from the crease using "window wiper motions" to blend the smokey eye upwards and out toward the sticky tape you have in place. Once you have finished blending up from the crease, take the tape off and hopefully you will have something that resembles this....


Take you blending brush and just gently soften the line that was made by the tape, so there's no harsh line. Do abit more blending if you feel the need or you may feel you need to add some more black or grey depending on how dark you want to go. Apply your brow highlighter and bring it down to the grey..blend these two gently together so again there is no harsh line. It should look like they merge into one another. Line under your lower lashes with the kohl pencil and then smudge it out a wee bit with the gunmetal grey eyeshadow. Line the rims of your eyes (the waterline) with the kohl pencil.

Line your lips, fill them right in with the pencil and then smooth it out with some gloss.


I didn't use any blusher, with a look this dramatic I just concentrate on the eye. However I did use some bronzer as a contour on my cheeks and abit on my temples.


Here is the finished look....